Applies To: ThreatSync+ NDR
The ThreatSync+ NDR Collection Agent for Windows receives log data from switches and routers in your network and sends the data to WatchGuard Cloud.
The ThreatSync+ NDR Collection Agent listens on:
- Port 2055 for NetFlow log data from endpoints.
- Port 6343 for sFlow log data from endpoints.
- Port 514 for DHCP log data from the Windows Log Agent.
You can install the ThreatSync+ NDR Collection Agent on Windows computers that run Windows 10, Windows 11, or Windows Server 2022.
For detailed information about supported operating systems and virtualization environments for Windows, go to System Requirements.
Download and Install the WatchGuard Agent for Windows
The installation of the WatchGuard Agent for Windows and the ThreatSync+ NDR Collection Agent is a two-step process.
To add and configure a collector, you must first download the WatchGuard Agent installer for Windows and then run the installation wizard on a Windows computer or server you want to configure as a collector. When you install the WatchGuard Agent, it then installs the ThreatSync+ NDR Collection Agent or Windows Log Agent. Use the ThreatSync management UI to specify which Windows computers or servers to use as collectors.
Caution: You cannot install the ThreatSync+ NDR Collection Agent on endpoints that have Panda or Cytomic endpoint security products installed. The ThreatSync+ NDR Collection Agent is only compatible with WatchGuard Endpoint Security products.
Before You Begin
Before you download the WatchGuard Agent for Windows, make sure that:
- The computer you want to install the agent on has antivirus software installed.
- You have Administrator permissions and are logged in to the Windows computer where you want to install the WatchGuard Agent.
System Requirements
Make sure that virtualization is enabled in the BIOS and that Virtualization-Based Security (VBS) is enabled for virtual environment hosts.
For more information, go to:
- Enable Virtualization on Windows PCs
- Virtualization-Based Security (VBS)
- Enable or Disable VBS For an Existing VM in the VMware Host Client
If you run the collector on Hyper-V, Nested Virtualization must be enabled. For more information, go to Nested Virtualization and Run Hyper-V in a Virtual Machine with Nested Virtualization.
To avoid Nested Virtualization, we recommend that you run the collector on a dedicated physical device instead of a virtual device.
The ThreatSync+ NDR Collection Agent for Windows must meet these requirements:
- Windows 10, Windows 11, or Windows 2022 installed with:
- Minimum CPU cores: 2
- Minimum of 8 GB RAM and 150 GB of disk space
For networks with a NetFlow rate greater than 500,000 per minute, more CPUs, RAM, and disk space are required.
The Windows installer is compatible with computers with an x86 or ARM processor.
For more information about supported operating systems and virtualization environments, go to the Troubleshoot the ThreatSync+ NDR Collection Agent for Windows section in this document, or the Operating System Compatibility for ThreatSync+ NDR Components in the ThreatSync+ NDR Release Notes.
Install the WatchGuard Agent for Windows
Install the WatchGuard Agent on each Windows computer you want to configure as a collector. Typically, you only have to install the ThreatSync+ NDR Collection Agent on one computer for each physical location in your network.
We recommend that you install the agent on a dedicated computer with a unique administrator account so that the administrator can always be logged in. If the administrator account that installed the agent is not logged in, the collector does not run.
To install the WatchGuard Agent for Windows:
- Log in to your WatchGuard Cloud account.
- For Service Provider accounts, from Account Manager, select My Account.
- Select Configure > ThreatSync+ Integrations > Collectors.
- On the ThreatSync+ NDR Collection Agents tab, click Add Collector.
- In the Download and Install the WatchGuard Agent section, click Download the WatchGuard Agent.
The Download WatchGuard Agent Installer dialog box opens. - In the Download WatchGuard Agent Installer dialog box, select Windows.
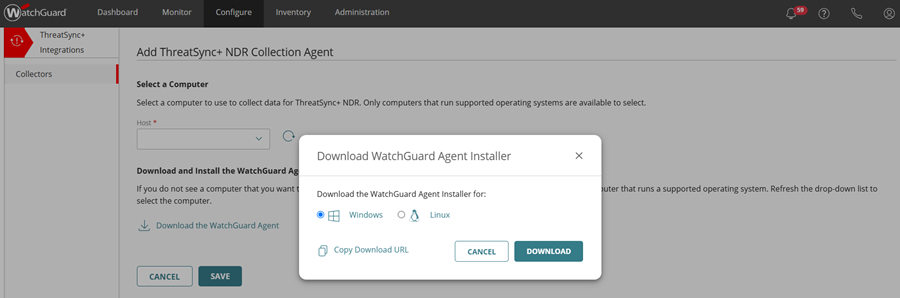
- (Optional) Click Copy Download URL to save the download URL.
- Click Download.
The Windows WatchGuard_Agent.msi file downloads. - Copy the .MSI file to the Windows computer or server you want to receive logs from.
- Double-click the WatchGuard_Agent.msi file and complete the steps in the wizard.
A progress bar shows during the installation process. The agent opens an Ubuntu console window during installation. You should not close this window. The Windows computer or server will restart to complete installation.
To verify that the WatchGuard Agent installed successfully, make sure that the ThreatSync+ NDR Collection Agents tab shows a Success status. The Windows collector shows real-time status that updates approximately every five minutes.
For information about how to uninstall the WatchGuard Agent or the ThreatSync+ NDR Collection Agent, go to Delete the ThreatSync+ NDR Collection Agent for Windows.
Configure Collectors for ThreatSync+ NDR
To collect Active Directory DHCP logs, you must add and configure both types of collection agents in your network — first the ThreatSync+ NDR Collection Agent, and then the Windows Log Agent.
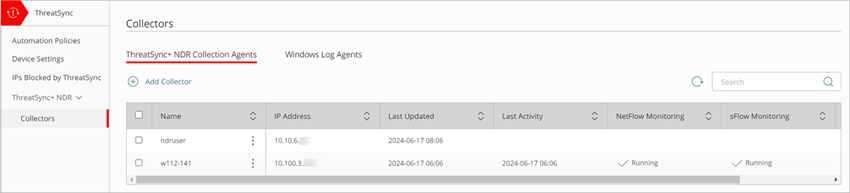
You configure ThreatSync+ NDR Collection Agents on the Collectors page.
The ThreatSync+ NDR Collection Agents tab shows these columns:
- Name — Name of the collector.
- IP Address — IP address of the computer where the collector is installed.
- Last Updated — The date and time the collector data was last updated.
- Last Activity — The date and time the collector last sent data to ThreatSync+ NDR.
- NetFlow Monitoring — Shows the status of NetFlow monitoring (whether the nfcapd process is running). For example, Running or Stopped.
- sFlow Monitoring — Shows the status of sFlow monitoring (whether the sfcapd process is running). For example, Running or Stopped.
- Status — Shows the status of the collector. Click the status to view more information. Status can include:
- Success — The collector is installed and receiving network data.
- No Information — Could not report the status of the collector.
- Offline — The collector is offline.
- Error — The collector encountered an error. For more information, go to Troubleshoot the ThreatSync+ NDR Collection Agent for Windows.
Add a ThreatSync+ NDR Collection Agent for Windows
Typically, only one ThreatSync+ NDR Collection Agent is required for each physical location in your network. To collect DHCP data logs, you must add the ThreatSync+ NDR Collection Agent on a Windows computer with a static IP address.
To add a ThreatSync+ NDR Collection Agent:
- Log in to your WatchGuard Cloud account.
- For Service Provider accounts, from Account Manager, select My Account.
- Select Configure > ThreatSync+ Integrations > Collectors.
- On the ThreatSync+ NDR Collection Agents tab, click Add Collector.
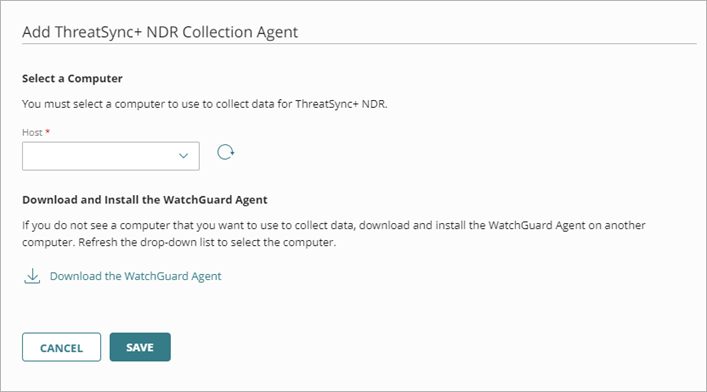
- From the Host drop-down list, select the Windows computer that you want to use as a ThreatSync+ NDR Collection Agent.
This list includes all Windows computers with the WatchGuard Agent installed. To refresh the list of available computers and servers, click .
. - Click Save.
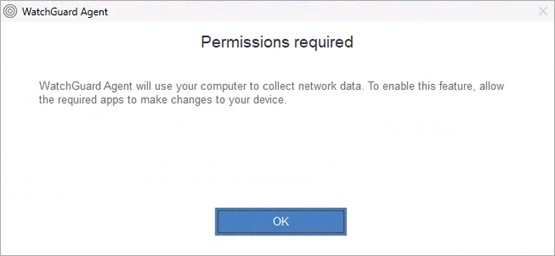
The collection agent starts to report data to ThreatSync+ NDR. You can view reported traffic information on the Network Summary page. - On your host computer, click OK when the Permissions Required dialog box opens.
It might take some time for the Permissions Required dialog box to appear on the host computer.
Record the IP address of the ThreatSync+ NDR Collect Agent. You must enter the IP address to configure the Windows Log Agent.
Mute ThreatSync+ NDR Collection Agent Failure Notifications
You can edit an existing ThreatSync+ NDR Collection Agent and mute failure notifications from a specific collection agent. You can also mute failure notifications from a log source that you add and configure.
To configure failure notifications for an existing ThreatSync+ NDR Collection Agent:
- Log in to your WatchGuard Cloud account.
- For Service Provider accounts, from Account Manager, select My Account.
- Select Configure > ThreatSync+ Integrations > Collectors.
- On the ThreatSync+ NDR Collection Agents tab, next to the ThreatSync+ NDR Collection Agent you want to edit, click
 . Click Edit.
The mute failure options appear.

- Select one of these options:
- Mute repeated failure notifications — Select this option to mute successive collector failure notifications for this collector. When selected, only a single notification is sent for this collector when a collector failure occurs.
- Mute all failure notifications — Select this option to mute all collector failure notifications for this collector. When selected, no notifications are sent for this collector when a collector failure occurs.
- Mute failure notifications from these sources — Select this option to add and configure specific log sources that you want to mute failure notifications for. This option mutes all collector failure notifications for your configured log source. When selected, no notifications are sent for this log source when a collector failure occurs. To add a log source, go to Step 6.
- Select Mute failure notifications from these sources to add and configure a log source that you want to mute notifications for.
- Click Add Source and Type.
The Add Source and Type dialog box opens.

- Click Add Source and Type.
- In the Source text box, enter the source IP address.
- In the Type drop-down list, select NetFlow/sFlow or DHCP for the type of source.
- Click Add.
- Click Save.
The new source is added.
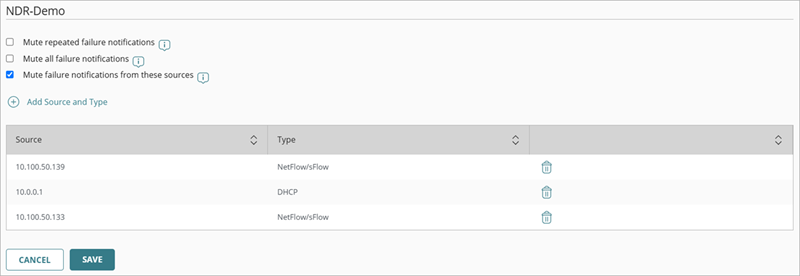
- To delete a source, click
 . Click Save.
Delete the ThreatSync+ NDR Collection Agent for Windows
If you no longer want to use a specific ThreatSync+ NDR Collection Agent, you can delete it from the ThreatSync+ Integrations UI. When you delete the collection agent from the UI, the WatchGuard Agent automatically uninstalls the collection agent.
To delete a ThreatSync+ NDR Collection Agent:
- Log in to your WatchGuard Cloud account.
- For Service Provider accounts, from Account Manager, select My Account.
- Select Configure > ThreatSync+ Integrations > Collectors.
- On the ThreatSync+ NDR Collection Agents tab, select one or more collectors you want to delete.
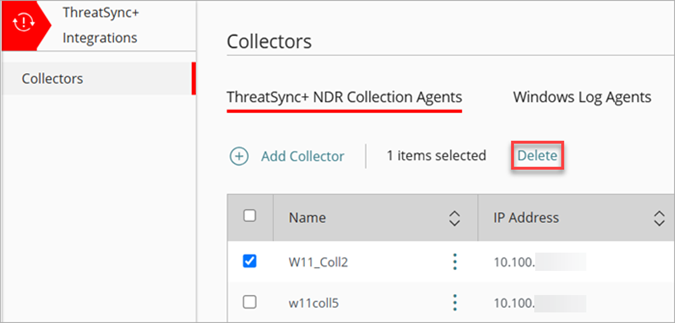
- Click Delete.
The WatchGuard Agent uninstalls the ThreatSync+ NDR Collection Agent.
To uninstall the WatchGuard Agent along with the ThreatSync+ NDR Collection Agent, uninstall it from the computer or server where you installed it. For more information, go to the product documentation for your computer or server.
Install the Windows Log Agent
The Windows Log Agent is a collection agent that reads Windows DHCP server logs and then forwards them to the ThreatSync+ NDR Collection Agent. The ThreatSync+ NDR Collection Agent then forwards the DHCP logs to WatchGuard Cloud.
For the ThreatSync+ NDR Collection Agent for Windows to receive DHCP server logs, you must install and configure the Windows Log Agent in your network. You can install the Windows Log Agent on Windows Server 2019 or 2022. Some of these servers could also be domain controllers. For more information, go to Configure the Windows Log Agent.
To keep track of devices when they change their IP address, we recommend that you use the Windows Log Agent to collect Active Directory DHCP logs. Add and configure the Windows Log Agent on all DHCP servers.
Troubleshoot the ThreatSync+ NDR Collection Agent for Windows
If you do not see reported traffic information on the Network Summary page within 60 to 90 minutes, you can use the information in this section to troubleshoot collector issues.
To troubleshoot ThreatSync+ NDR Collection Agent for Windows:
- Make sure that the Windows computer meets the requirements described in the System Requirements section.
- Make sure that the administrator account that installed the WatchGuard Agent is logged in to the Windows computer where the ThreatSync+ NDR Collection Agent is installed. We recommend that you create a dedicated installation administrator account. The installation administrator must always be logged in.
- During the installation process, the WatchGuard Agent opens a Ubuntu console window. Do not close this window. Use the wsl -l PowerShell command to confirm that the WatchGuard Agent was successfully installed.
- Use the netstat -l PowerShell command to confirm that the computer is able to listen on these ports:
- Port 2055 — NetFlow log data from endpoints
- Port 6343 — sFlow log data from endpoints
- Port 514 — DHCP log data from the Windows Log Agent
- Make sure that there is no firewall rule that blocks traffic from these ports: 2055, 6343, and 514. For a cloud-managed Firebox, remove the blocked port 514 on the Configure > Devices > Device Configuration > Network Blocking page in WatchGuard Cloud. For information about how to remove a blocked port for locally-managed Fireboxes, go to Block a Port in Fireware Help.
- Make sure that virtualization is enabled in the BIOS. These virtualization environments are verified:
| ThreatSync+ NDR Collector Virtualization Environment | Microsoft Windows 10 | Microsoft Windows 11 | Microsoft Windows Server 2022 |
|---|---|---|---|
| Hyper-V |

|
|
|
| VMware ESXi 6.7 |
|
|
|
| VMware ESXi 7.0.3 |
|
|
* |
| VMware ESXi 8.0 |
|
|
|
| KVM Hypervisor QEMU 9.0.0 |
|
|
*Windows Server 2022, build 20.348.2527
- On the Configure > ThreatSync > ThreatSync+ NDR > Collectors page, review the Status column in the Collectors table. Click the status for more information:
- Success — The collector is installed and receiving network data.
- No Information — Could not report the status of the collector.
- Offline — The collector is offline.
- Error — The collector encountered an error.
If you encounter Generic Error 1603, verify that you have virtualization enabled. For more information, go to System Requirements.
To troubleshoot the Windows Log Agent, go to Troubleshoot Windows Log Agent Issues.
Configure Collectors for ThreatSync+ NDR (Linux Computers)